|
|
Home > Tip N Roll Sign Assembly Instructions
| | |
|
ASSEMBLY
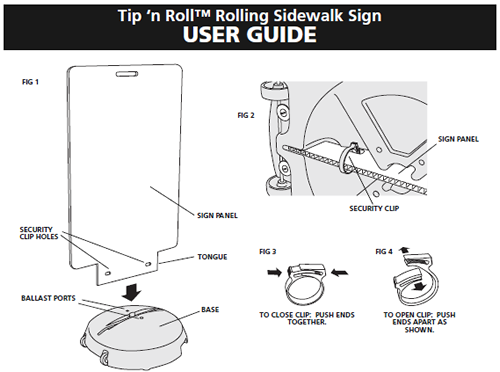
1. Install the 3 no-mar anti-slip feet by pushing Feet into holes on bottom of Base and pressing drive pin in completely to lock foot into hole.
2. Install the Sign Panel by inserting the cut out portion (tongue) into the slot in the top of the Base.
3. Install the Sign Panel before lettering the Message Board or after decorating the Ready 4 Graphics model.
4. Turn the sign on its side to reveal the bottom and install the 2 Security Clips into the holes in the Sign Panel that are visible from the bottom of the sign. The head of the clip fits in the hole and then ratchets together by squeezing. To remove, just slide the mating parts sideways as illustrated. See FIG. 3 & 4.
5. Remove the Ballast Port Plugs and fill the Base with sand, gravel or water. If using water do not exceed 3 gallons. Unit can withstand freezing but salt or RV antifreeze can be added to prevent freezing.
6. The sign is now ready for use. To move sign just grip the handhold, tip the sign and roll into position by pulling.
HELPFUL HINTS
• Sign rolls best by pulling, not pushing.
• Letter the Message Board models after the sign face has been installed by bending the letter sheets at the score lines to break apart the letters.
• Decorate the Ready 4 Graphics model before installation. Sign panel can be decorated with digital graphics, computer cut vinyl graphic or screen-printing.
• Keep design/layout simple for maximum impact. For more versatility put a different message on each side.
• To empty ballast (water, sand, etc.) remove Ballast Caps and pour out material. Replace Ballast Cap.
• Tip’n Roll™ signs are designed for winds up to 20-30 mph. In the event of higher winds bring sign inside or add more ballast.
| |
| | |
|
|